I found the Toshiba DVR620 that has a standard function of dubbing VHS to DVDs. I'm sure that there are others out there but on Amazon this item had a 4 star rating, over 2,000 reviews and 1,000+ answered questions.
My goal was to convert the VHS videos to digital, e.g. MPEG-2, rather than just move them to DVDs. So what I did was scrounge up an old DVD+RW disk. I dubbed each VHS tape to this DVD+RW disk, copied the full video to my Drobo, cut the full video into logical segments with VideoRedo and uploaded them to Google Photos.
Here are the properties of the MPEG-2s:
I have had one problem with tracking and I couldn't adjust that out. I guess on a 30+ year old tape made using a rented camcorder that's Ok. I've had a couple of tapes that the leader separated from the reel when I rewound it. This YouTube will walk you through fixing that. Instead of rewinding it at high speed and risking this separation you could press PLAY [10] and then REV [9]. The downside of this is that it moves the oxide over the heads and if the tape is very old the oxide could flake off and the video is ruined.
Overall the process has worked very well.
The User Guide is here.
Here's the step by step.
Remote
Setup
- Connect the DVR620 to a TV. I used an old flat screen and used HDMI just for simplicity.
- Turn on the TV.
- Turn on the DVR620 [17].
- Press DVD [31]. Press INPUT SELECT [1] so that either L1 or L2 appears. You can't do DVD dubbing when L3 is chosen.
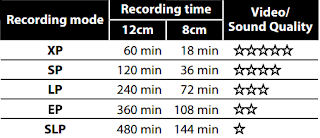
- Press REC MODE [32] repeatedly until you see the record mode that you want to use. I use SP to get 2 hours on the DVD+RW.
Repeat for each tape
- Press DVD [31]. Press OPEN/CLOSE [2] and place the DVD+RW in the DVD tray. Press OPEN/CLOSE [2] to close the tray.
- Press SETUP [4].
- Navigate to the DVD menu and format the DVD+RW.
- Press VCR [30].
- Insert the VHS tape in the tape slot. At this point the tape may begin playing if read/write tab has been removed. I always press STOP [10] and then REV [9]. When it finishes rewinding. I press OPEN/CLOSE [2] to eject the tape and then reinsert the tape and press STOP [10]. This will reset the time displayed to 0:00. This is significant as dubbing will stop automatically if no image is detected for more than 3 minutes. One of my tapes stopped at 39 minutes and I had to restart the dubbing.
- If you want to be selective about what you dub to the DVD now is the time to position the VHS tape. If not, press DUBBING [13] and sit back. If you get a blinking red light on the unit you have a problem with the DVD. Remember you have to format EVERY time.
- If you want to be selective about what you dub to the DVD press STOP [10] when you're done. I just let the tape run to the end and it stops dubbing automatically.
- Just to make sure the tape is rewound I press REV [9]. When it finishes rewinding. I press OPEN/CLOSE [2] to eject the tape.
- Press DVD [31] then press SETUP [4]. Navigate to the DVD menu and finalize the DVD+RW.
- Press OPEN/CLOSE [2] to eject the DVD+RW.


No comments:
Post a Comment