Sunday, December 25, 2016

HD Voice

After I got my BlackBerry PRIV I started noticing that some phone calls sounded crystal clear. It took a while to recognize that it was just calls with certain people and hence certain phones.

I most often noticed it when I was speaking with my daughter and her iPhone 6. I Googled around trying to figure out why those calls were different.

What I came across was the HD Voice feature that AT&T has enabled using their Voice over LTE (VoLTE).

Here's a brief explanation of what HD Voice is:
HD Voice is essentially wideband audio technology, something that long has been used for conference calling and VoIP apps. Instead of limiting a call frequency to between 300 Hz and 3.4 kHz, a wideband audio call transmits at a range of 50 Hz to 7 kHz, or higher. That’s much more in line with the human voice, which transmits audio between 75 Hz and 14 kHz. 
HD Voice also takes in more audio samples per second than a standard call. Instead of 8,000 audio samples per second, HD Voice calls double that to 16,000. That way, you’re able to hear more details in a person’s voice during a call.
Source: Wired
But you have to hold your mouth right to get HD Voice. For example the iPhone 5 has the technology but AT&T has elected to only support HD Voice over their VoLTE which the iPhone 5 doesn't support. AT&T could support HD Voice over GSM (which the iPhone 5 does support) but AT&T has elected not to.

Here's AT&T's page on their HD Voice. Notice that it requires specific SIM cards. Don't sweat checking your SIM card. Just walk into an AT&T store and ask for a new SIM. They're free and it'll only take a couple of minutes.


Here are AT&T's phones that support HD Voice.

My daughter's iPhone 6 does support VoLTE as does the BlackBerry PRIV so if the planets are aligned I get HD Voice calls with my daughter.

Sunday, December 18, 2016

Windows Defender Offline

I've been a fan of Windows Defender, formerly Windows Security Essentials, for a while mostly because it is free but it's also quiet. Recently I heard a discussion that recommended Windows Defender over third party alternatives since Windows Defender didn't add any new attack surfaces to Windows, e.g. Symantec.

Anyway this discussion is about a new capability added in Windows 10 version 1607 Anniversary Update. I stumbled on this when checking for new updates.

Go to Windows key + Check for updates

In the left-hand column, click on "Windows Defender."


Scroll down until you see "Windows Defender Offline". Click on "Scan Offline".


After you click this button, your computer will automatically reboot and begin scanning your PC for malware. The scan may take up to fifteen minutes. If any malware is found, you’ll be prompted to clean it up from within the Windows Defender Offline interface. If no malware is found, your computer will automatically boot back into Windows once the scan is complete.
Source: How-To-Geek
For me it ran a "Quick scan" and took just under 4 minutes. 


Sunday, December 11, 2016

Windows 10 Notification Tweaks

This article got me to looking around in Windows 10's notification settings.

When you've got time on your hands go to these pages in Windows 10 settings and judiciously turn things off.

Windows key + Notifications & Actions


You can also click on the icons in the list "Get notifications from these senders" and fine tune each app's notifications.

Here's what Dropbox's looks like.


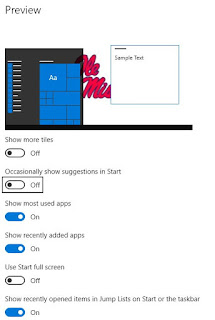
Windows key + suggestions


Look around. You'll find lots to tweak.

Sunday, December 04, 2016

Red, Green, Blue and Purple

No, I'm not talking about video signals.

I listen to a lot of security podcasts. I'd been hearing them talk about "red teams" and "blue teams." I didn't know what they were talking about.

So off to Google and I came up with this.

These terms refer to teams that participate in penetration tests.
Red Teams are external entities brought in to test the effectiveness of a security program. This is accomplished by emulating the behaviors and techniques of likely attackers in the most realistic way possible.
Blue Teams refer to the internal security team that defends against both real attackers and Red Teams. Blue Teams should be distinguished from standard security teams in most organizations, as most security operations teams do not have a mentality of constant vigilance against attack, which is the mission and perspective of a true Blue Team.
Purple Teams exist to ensure and maximize the effectiveness of the Red and Blue teams. They do this by integrating the defensive tactics and controls from the Blue Team with the threats and vulnerabilities found by the Red Team into a single narrative that ensures the efforts of each are utilized to their maximum. When done properly, 1 + 1 will equal 3.
So what are Green Teams?
Green Teams behave as common users of the services provided by the Blue Team.
Reminds me of the old joke.
End users are there to create a test workload.


Sunday, November 27, 2016

Decrapification of the PRIV

From the Urban Dictionary:
decrapification - The act of removing all the pre-installed crap from your Dell or HP computer PRIV smartphone. 
Other than the one time problem I had with Carrier IQ I really never had a problem with the AT&T bloatware on the BlackBerry PRIV.

In late summer 2016 many PRIVs started experiencing "No Service" when using LTE. There was some speculation that the problem was related to changes AT&T made in their LTE network to support the iPhone 7 running a new radio chip. In early November BlackBerry released an apk that corrected the "No Service" situation.

But that was just the tip of the iceberg.

It seems that AT&T has pretty much walked away from the PRIV. Obviously they dumped a large portion of their PRIV inventory onto liquidators as I bought mine for $300 with a carrier unlock code taped to the unsealed AT&T box.

A couple of days after BlackBerry released the "No Service" apk they rolled out a 1.8GB (not a typo) Over the Air (OTA) update to remove all the AT&T software from the now orphaned AT&T BlackBerry PRIVs.


Just for icing on the cake, this OTA included the Android November security updates.


The AT&T boot animation (including music) is gone and the software updates now come from BlackBerry, not AT&T.


Maybe it should be called the Nexus PRIV.

You really have to give some props to BlackBerry for this.

Sunday, November 20, 2016

Windows 10 is the Last Version of Windows - NOT

Do you remember Microsoft's statement about Windows 10?
"Right now we’re releasing Windows 10, and because Windows 10 is the last version of Windows, we’re all still working on Windows 10." Jerry Nixon, Microsoft
Source: The Verge
Don't believe everything you read on the Internet.

As of the end of 2016 there have been 3 "versions" of Windows 10. Here are 2 pages from Microsoft that call out the "versions."


But here's the issue with this relatively rapid push of Windows "versions."

Each of these "versions" (1507, 1511, 1607) are the process equivalent of a Windows upgrade. Each time you get one of these pushed via Windows Update your system goes through a Windows upgrade process similar to going from Windows 7 to Windows 8.

While the process is greatly streamlined from the Windows 7 to Windows 8 upgrade, the system still suffers all the trauma of a Windows upgrade.

I have been pleased up until the Anniversary Update (1607). Early on with 1607 I heard rumblings of problems with the upgrade. One of the problems had to do with systems booting from SSDs so since I am running Windows 10 Professional I was able to defer the upgrade.

After things quieted down I decided to let Trump upgrade. The process took about an hour and had every appearance of going perfectly.

Until...

After the upgrade I played around for a few minutes and everything seemed to be working so I turned in for the night. In the morning I went back in to check it and the screen wouldn't come back on. The system unit's power light was on but it wouldn't wake up for a tap of the power button. It took a hard reboot to get it back working.

Again everything seemed to be working so I walked away. When I came back in a little while it was locked up again. I started problem determination and finally associated the lockup with the power plan turning off the display. I set the time to "never" and it stayed up all night.

Then I remembered that a day or two before the upgrade AMD updated the video drivers for the Radeon V7 240. I went to the Start menu and typed "AMD". There was an entry there for AMD's utility but when I clicked on it it was missing.

The Anniversary Update had SILENTLY REMOVED the necessary drivers and the utility that I had installed to maintain them. I went back to the AMD site and download and reinstalled the proper drivers.

Fixed.

Why did Anniversary Update do that and break my system? What if I had been a "normal" user and didn't have the problem determination/resolution skills that I have?

That was the first problem.

Then I went back to my day to day laptop. I had a file that I needed to save on the D: drive of Trump. I was prompted for a userid/password.

I hadn't had to do that before the Anniversary Update. So off I went to do problem determination on this problem.

It turns out that you now have to turn off password protected sharing.

Neither of these are real show stoppers but if Microsoft is going to churn Windows versions twice a year they have GOT to overcome these types of problems.

Sunday, November 13, 2016

Network Sharing

I always share the data drive of my "server" with the house. My goal is to make it painless, i.e. no passwords.

Every time I rebuild the server (or upgrade Windows, e.g. Anniversary Update) I have to remember what to do.

Here's how I do it.

Sharing a folder in a network
  1. Right-click on the folder/drive that you wish the share and select "Properties".
  2. Select the tab "Sharing" and click on "Advanced Sharing..."
  3. Tick the box "Share this folder" and enter a share name for it.
  4. Click on permissions, mark the group entry "Everyone" and configure the network permissions for this folder in the lower field according to your requirements. If you just want to release your files for copying, allowing "Read" is usually enough.
Setting the right permissions
  1. Right-click on the folder/drive in question and select "Properties" again.
  2. This time, switch to the tab "Security" and click on "Edit...", followed by "Add...".
  3. In this window, enter "Everyone" into the empty field at the bottom and click on "OK".
  4. Take a quick look at the permissions for "Everyone" and make sure they are all set correctly. If everything is in order, close all windows with "OK".
Deactivating password-protected sharing
  1. Open the control panel and go to "Network and Sharing Center".
  2. Click on "Change advanced sharing settings".
  3. Look for "All Networks", expand it (if it isn't already) and scroll down to the option "Password protected sharing".
  4. Check the option "Turn off password protected sharing" and click on "Save changes". Be aware that this will make all shared folders readily accessible for anyone inside your home network.
Source: PC Advisor


Sunday, November 06, 2016

Smart Lock for Android

Android 5.0 Lollipop introduced a new Smart Lock feature. Smart Lock allows you to declare specific situations where you want your phone to be unlocked.

I use this feature and find myself only having to enter my PIN 1-2 times per day.

Here's how to do it.

I use "Trusted devices," "Trusted places" and "On-body detection."

While "Trusted devices" and "Trusted places" are pretty obvious, "On-body detection" is more subtle.

"On-body detection" keeps the phone unlocked while it is moving such as in your pocket. When the device becomes still for a few seconds it locks and requires the PIN to access. An example is when you set the phone on a table for a few seconds it locks. Nice.

Overnight, specifically after 4 hours idle, the phone locks regardless of trusted situations.

As always there are 2 sides to this story. Here's the other.

Remember what the president of our company said "iPhone users just don't understand what they're missing."

Sunday, October 30, 2016

Google Opinion Rewards

One day at lunch a former co-worked asked me if I used Google Opinion Rewards. I hadn't heard of it. I found it in the Play Store and installed it.

Surveys pop up in the notifications bar and you can ignore them by swiping them away or clicking on them and taking the survey.

Upon completion Google gives you a nominal award of Google Play credit. Most run less than 50¢ but add up quickly.

Here are a couple of the recent surveys offered to me.


Thansks to gifmaker.me for the gifs.

Sunday, October 23, 2016

Not UPnP

If you don't read Krebs on Security you should. Recently his website was attacked by the largest Distributed Denial of Service (DDoS) attack ever seen. Investigation showed that it was powered by infected Internet of Things (IoT) devices, mostly media devices.

Subsequently he wrote a post on "Who Makes the IoT Things Under Attack?"

To me the key point in this post was:
...many IoT devices will use a technology called Universal Plug and Play (UPnP) that will automatically open specific virtual portholes or “ports,” essentially poking a hole in the router’s shield for that device that allows it to be communicated with from the wider Internet.
If you don't know what Universal Plug and Play (UPnP) is go read the wikipedia article here.

But that article is long and dry. The problem with UPnP is finally described here:
NAT traversal One solution for NAT traversal, called the Internet Gateway Device Protocol (IGD Protocol), is implemented via UPnP. Many routers and firewalls expose themselves as Internet Gateway Devices, allowing any local UPnP control point to perform a variety of actions, including retrieving the external IP address of the device, enumerate existing port mappings, and add or remove port mappings. By adding a port mapping, a UPnP controller behind the IGD can enable traversal of the IGD from an external address to an internal client.
Now read that again.
Many routers and firewalls ... allowing any local UPnP control point to ... add or remove port mappings.
Do you realize how BAD that is?

But the solution is easy. In your router just disable UPnP.


Do it NOW.

Update: Listen to Security Now 583

Update 2: I told you - Connections are allowed into the device from the outside world via UPnP.


Sunday, October 16, 2016

How to Turn Off LTE

There is currently a situation involving BlackBerry PRIVs and various mobile networks. The symptom is that your phone displays "No Service" and you have to reboot to restore service.

Along the way, I came across a technique to disable LTE and leave HSPA enabled.

LTE is a notorious consumer of battery and HSPA typically yields around 10Mbps down so even without the "No Service" issue turning off LTE is probably worth considering.

First go to the Dialer. Enter *#*#4636#*#*.


As soon as you enter the final asterisk, your phone should display a "Testing" menu.

Tap on "Phone Info".


The 4G LTE Switch app in the Play Store will take you directly to this menu. Scroll down until you see "Set preferred network type:"


Just below that you'll see the current network type, probably "LTE/GSM auto (PRL)" and a little "twistie" over to the right. Remember what that value is so you can reset to that if needed.

Tap on that "twistie."

Scroll through the resulting menu.


Tap on "GSM auto (PRL)". Now tap on the back button until you exit this menu. Don't just tap the home button.

Here's the download speed I'm getting.


You may have to repeat this after you restart your phone.

Sunday, October 09, 2016

Insteon Smarthome

My daughter came up with an idea to have her outside lights turn on at sunset and turn off at bedtime. That sounded simple until I tried to actually do it.

I found switches that actually had an embedded processor that you told the latitude and longitude and the time and it calculated sunset/sunrise.


That seemed straightforward but it was not to be.

She added an additional requirement that she wanted to be able to turn them on from her bed. That complicated it tremendously. Now the switches had to be networked.

Well, this did simplify the timing. The clock/timing could be managed centrally and the switches could just be sent on and off commands.

What I found was Smarthome.com's Insteon system.

The switches would fit in a regular plate.


They could be managed by a controller.


Let's just say "Don't do that." Smarthome replaced the Controller with their Hub.


Smarthome has an app that controls the Hub.

That seemed so simple. It wasn't.

Thankfully the 3 circuits involved were all single switched circuits. 3-way circuits are much harder.

So I removed the old switches and installed the Insteon switches. After lots of reading manuals and a couple of calls to Smarthome's support (actually pretty good) I got 2 of the 3 working.

To net it out, the switch that wasn't working was on a different leg of the breaker box. I had an electrician come out and move the breaker for the non-working circuit to the "right" place.

He didn't understand it either. He just moved it around in the breaker box and it was still on a different leg.

So I started looking for alternative ways to bridge the legs.

I found a Range Extender that bridges the legs.

Smarthome said you had to use the Range Extenders in pairs but I read the documentation closely and decided that the Hub would act as the other member of the pair. I moved from receptacle to receptacle around the house until the light turned green and I was done!

Total elapsed time - 18 months!

Then she moved. I inherited the parts and pieces and moved them to my house where they worked fine the first time.

I'm so satisfied that I have expanded my system with a lamp module.


Sunday, October 02, 2016

Disconnect Windows 10 From Microsoft Account

Ok, so I've done it TWICE. That is I have twice inadvertently associated my Microsoft ID with my Windows 10 instance. When (not if) you do this, here's how to unassociate your Microsoft ID.

The best instructions I have found are here. I have cleaned up the language a little. This is for Windows 10 1507 so the screens may be slightly different.
  1. Firstly, setup another admin account so that you have a way in if things go wrong.
  2. Next, save all your work because it may lock your mouse/screen and won't let you save your work at the end of this process.
  3. Then, go to your start button
  4. Go up to the top and click on your profile name/account
  5. Then click "change account settings"
  6. In the "your account" tab, just above your account picture there will be an option to select a button saying "log on using local account" or "change log on to local account" (something along these lines)
  7. Click this and it will give you an opportunity to (from now on) log onto your computer using a new password that IS NOT linked to your Hotmail or Microsoft account.
  8. Then when you use the admin as the account name, it will complain that the account is already in use. So use a different name, say tmp.
  9. It will ask you to save your work and logout (but may not give you a chance to save. Proceed to finish the process/logout.
  10. Now login to an admin account (either the new "tmp" account if it was administrator or the other one that you created). 
  11. Go to control panel, user accounts and eventually find the setting to rename an account.
  12. Rename the tmp account (now delinked from online account) back to the name it was.
  13. Logout and back in.
  14. You are set.
Worked for me, twice.

Sunday, September 25, 2016

ARM Server Chip - For Real

You heard it here 4 years ago - ARM Server Chip.

Now it comes to reality - Fujitsu: Why we chose 64-bit ARM over SPARC for our exascale super

And it displaces my beloved SPARC chip.

A few quotes from Fujitsu...
When was the last time you heard nice things about SPARC Linux?
Fujitsu chose 64-bit ARM CPU cores for its upcoming exascale supercomputer for two reasons: Linux and the ability to customize its own processors.
[Fujitsu] chose ARM over SPARC due to ARM's larger and healthier software ecosystem.
ARM has the best software ecosystem for us.
And you thought Intel and Sun ruled the world.

Sunday, September 18, 2016

Chromecast Data Usage

I love my new router.

When I was looking at the Traffic Monitor I noticed that my Chromecast was in my top 5 clients. This chart is only about 5 days into my using the Asus RT-AC68R.


I found this thread on reddit. In that thread there's a link to a earlier thread.
Bottom line is that a chromecast will use 8-20 MB per hour when turned on and idle no matter what. Disabling or changing backdrop settings does not disable the background images, it just customizes them. When backdrop is disabled, new images still appear at the same rate, just with a message about enabling backdrop in the lower right instead of information about the image. 
The workaround I found was to power the chromecast from the TV's USB port instead of using the wall adapter, so it's only on when the TV is on. This isn't perfect, because the chromecast is still on when watching regular TV. Additionally, the chromecast takes time to start up. Unfortunately, one of my TV's doesn't have a USB port so I can't do anything about that set.
My old TV didn't have a powered USB port. When I migrated to the new TV I just moved the Chromecast along with the wall adapter USB power. My new TV does have a powered USB port so I moved the Chromecast's USB cable to that and the problem is solved mitigated.


Sunday, September 11, 2016

Asus RT-AC68R First Look

Almost 3 years ago one of my former co-workers told me he had just upgraded to an Asus router and it really improved his throughput. He didn't remember which it was so I started shopping.

You'd know I'd come up with something cheap inexpensive. I got a refurbished Asus RT-N65R. It has performed very well for me.

Until...

We have been noticing some blips of the Internet but my EMCO Ping Monitor didn't complain. I finally realized that it was the radio in the router failing.

So my quest for a new router started.

I really liked the ASUSWRT firmware. But the firmware for the RT-N65R hadn't been updated since January 2015. Operationally it was fine but I was worried about security patches.

While Comcast has raised their bandwidth "trial" to 1 GB I still am interested in tracking my bandwidth usage. I wanted to maintain this ability and even expand it to tracking by device.

I looked at dd-wrt and Tomato. There are plugins for those firmwares to do this but it takes more command line skills than I was ready to tackle.

My son-in-law had the Asus RT-AC68R. It is dual-band 1900 Mbps so it is FAST. And its firmware is still being updated.

Not only does it have the same bandwidth reporting as the RT-N65R but it will break out bandwidth by client and application.


Incredible!

And there's so much more to play with. Like Merlin.

Sunday, September 04, 2016

VHS to Digital Dubbing

The recent news that the last maker of VCRs was halting production scared me into action. I have upwards of 100 VHS tapes dating back to 1982. I still have several VCRs but my SageTV box that I could use to convert the VHS tapes to digital has long since bitten the dust.

I found the Toshiba DVR620 that has a standard function of dubbing VHS to DVDs. I'm sure that there are others out there but on Amazon this item had a 4 star rating, over 2,000 reviews and 1,000+ answered questions.


My goal was to convert the VHS videos to digital, e.g. MPEG-2, rather than just move them to DVDs. So what I did was scrounge up an old DVD+RW disk. I dubbed each VHS tape to this DVD+RW disk, copied the full video to my Drobo, cut the full video into logical segments with VideoRedo and uploaded them to Google Photos.

Here are the properties of the MPEG-2s:


I have had one problem with tracking and I couldn't adjust that out. I guess on a 30+ year old tape made using a rented camcorder that's Ok. I've had a couple of tapes that the leader separated from the reel when I rewound it. This YouTube will walk you through fixing that. Instead of rewinding it at high speed and risking this separation you could press PLAY [10] and then REV [9]. The downside of this is that it moves the oxide over the heads and if the tape is very old the oxide could flake off and the video is ruined.

Overall the process has worked very well.

The User Guide is here.

Here's the step by step.

Remote

Setup
  1. Connect the DVR620 to a TV. I used an old flat screen and used HDMI just for simplicity.
  2. Turn on the TV.
  3. Turn on the DVR620 [17].
  4. Press DVD [31]. Press INPUT SELECT [1] so that either L1 or L2 appears. You can't do DVD dubbing when L3 is chosen.
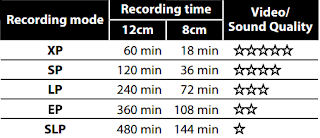
  5. Press REC MODE [32] repeatedly until you see the record mode that you want to use. I use SP to get 2 hours on the DVD+RW.
Here's what the various recording modes mean:

Repeat for each tape
  1. Press DVD [31]. Press OPEN/CLOSE [2] and place the DVD+RW in the DVD tray. Press OPEN/CLOSE [2] to close the tray.
  2. Press SETUP [4].
  3. Navigate to the DVD menu and format the DVD+RW.
  4. Press VCR [30].
  5. Insert the VHS tape in the tape slot. At this point the tape may begin playing if read/write tab has been removed. I always press STOP [10] and then REV [9]. When it finishes rewinding. I press OPEN/CLOSE [2] to eject the tape and then reinsert the tape and press STOP [10]. This will reset the time displayed to 0:00. This is significant as dubbing will stop automatically if no image is detected for more than 3 minutes. One of my tapes stopped at 39 minutes and I had to restart the dubbing.
  6. If you want to be selective about what you dub to the DVD now is the time to position the VHS tape. If not, press DUBBING [13] and sit back. If you get a blinking red light on the unit you have a problem with the DVD. Remember you have to format EVERY time.
  7. If you want to be selective about what you dub to the DVD press STOP [10] when you're done. I just let the tape run to the end and it stops dubbing automatically.
  8. Just to make sure the tape is rewound I press REV [9]. When it finishes rewinding. I press OPEN/CLOSE [2] to eject the tape.
  9. Press DVD [31] then press SETUP [4]. Navigate to the DVD menu and finalize the DVD+RW.
  10. Press OPEN/CLOSE [2] to eject the DVD+RW.

Sunday, August 28, 2016

BlackBerry PRIV Experiences

I thought I had owned my last BlackBerry. But the $300 price of the PRIV was too good to pass up. And the big battery suggested long usage. The display is wonderful and the phone is fast. It updated Over The Air (OTA) to Marshmallow after a week or so with no problems. While it came with a SIM unlock code (that worked fine the first time) it does have a locked bootloader and is running an AT&T ROM. It'd been a while since I've used a carrier ROM and it came with its share of bloatware. I just disabled all of the AT&T software and that hasn't been a problem other than Carrier IQ I mentioned earlier.

The big screen is hard on the battery and while I can go all day on the battery I haven't observed the expected looooong battery life. The Marshmallow update did seem to improve it.

Before the Marshmallow update the battery ran down at 4.52% per hour. After the Marshmallow update it ran down at 3.29% per hour.


I haven't used the physical keyboard as I love the Google Keyboard. The keyboard makes it heavier than I expected.

A double tap on the screen wakes it up just like the OnePlus One.

Another carryover feature from legacy BlackBerrys is the holster magnet waking the PRIV when the phone is unholstered. Similarly the PRIV is put into sleep mode when you put it in the holster.

My previous phones have taken a couple of minutes for the Bluetooth to connect to my car. The PRIV connects before I get out of the driveway. I can't explain this. Other than slow connecting to the car I haven't had any Bluetooth problems with previous phones.

The PRIV has been getting Android security updates about a month later than my Nexus 5 does.

I like it.

Sunday, August 21, 2016

Carrier IQ

One day shortly after I started using the PRIV I decided I should try the AT&T DriveMode app. Let's just say it was aggressive. For example, I couldn't change the volume on Pocket Casts using the steering wheel controls while I was driving. I disabled it after my first drive. And then I noticed a new consumer of the battery that hadn't been present before.

Here's what the battery usage looked like before DriveMode:


Here's what the battery usage looked like after DriveMode:


Notice the battery usage by "Device Health Application" and the GPS activity.

So what is this "Device Health Application?"

This CrackBerry forum post answered that - Carrier IQ.

From my experience it seems that DriveMode triggered something in Carrier IQ that caused the GPS to run almost constantly.

A factory reset helped that but it took the Marshmallow upgrade to completely resolve this.

Here's what the battery usage looked like after Marshmallow:


Battery usage has been fine ever since and I haven't tried DriveMode again!

Sunday, August 14, 2016

SSD Migration

My X201 is getting slow with its 1TB Toshiba HDD. I installed that big drive for photo storage on my trip to Ireland. When I returned, I copied the photos to my primary storage so I haven't been using most of that 1TB.

Monthly I use Windows' "Create a system Image" tool to take an image backup of each of my PCs boot drive.

When I used this on the 1TB drive in the X201 I only selected the C: partition. I had resized this partition to less than 250GB so it would fit comfortably onto an SSD when I was ready to move that way.

2 months ago the monthly backup failed with drive errors on the C: partition of the 1TB HDD.


I pulled out my copy of SpinRite and let it run on Level 2. It confirmed that there were unrecoverable errors on it.

Not expecting much I tried Windows' chkdsk. My expectations were met. It would reboot to a command prompt and then run to 13% and sit there. While you weren't looking it would do something and reboot to Windows.

Windows kept on running fine but I knew it was a ticking time bomb.

I bought a Samsung EVO 500GB SSD and set out to move to it.

I had a Windows system image backup from 2 months ago. I installed the SSD and I booted from my Windows 10 installation USB drive. I went to "Troubleshooting" and chose "System Image Recovery."

I selected the backup image and began the restore.

But...

I got a message that "The disk that is set as active in BIOS is too small to recover the original system disk" with error 0x80042407.


The problem is that Windows system image backup requires a target drive that is as large as the sum of the partitions defined on the drive when the backup was made. This means that even though the partition I backed up was less than 250GB I needed a 1TB drive to restore to.

A word to the wise, test your backups.

As luck would have it I had a 1TB drive sitting around so I restored to it and then used the Samsung Data Migration tool to copy the partition to it.

In retrospect, after I had resized that system partition to 250GB I should have dropped the partition that was just holding a place on the drive before I took the Windows system image backup.

Sunday, August 07, 2016

Windows 10 Network Usage

A recent post on Winaero sent me looking at my Windows 10 network usage.

  1. Open the Settings app in Windows 10.
  2. Go to Network & Internet -> Data usage.
  3. On the right, click the link "Usage details".
  4. The next page will show you the data usage collected for last 30 days.


Nice.

But scroll down.


The second highest data usage is "System" and is out of sequence at the bottom. Microsoft, why put this at the bottom?

Sunday, July 24, 2016

The Trump Backups

When I built "The Trump" I used Windows Storage Spaces to create a mirrored data drive.

On the Storage Spaces I used Microsoft's Resilient File System (ReFS). The 2 TB drives I used had 4096 byte hardware sectors.

While I still believe that this was a solid technical decision it has caused me difficulties in backing up my data drive.

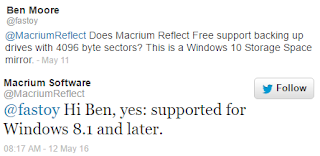
My "go to" backup solution Drive SnapShot didn't support 4096 byte sectors and couldn't give me a date for adding that support.


This sent me on a quest for alternatives.

For AOMEI Backupper Standard:


In summary I didn't find ANY personal backup (read that "free") tools that supported 4096 byte sectors and ReFS.

The best I could find was Macrium Reflect Free.


It supports 4096 byte sectors but treats the ReFS like a fully used GPT volume. With Reflect's compression and differential backups this has been acceptable.


I'm looking forward to the personal backup tools stepping up to these new technologies.

Sunday, July 17, 2016

OTG

OTG stands for "USB On-The-Go."

OTG is a "specification that allows USB devices ... to act as a host, allowing other USB devices ... to be attached to them. ... For instance, a mobile phone may read from removable media as the host device, but present itself as a USB Mass Storage Device when connected to a host computer."

Translation: An OTG drive can be plugged into a PC and then into a phone.

I had never played with these until I came across this one.


Then I couldn't find anything to do with it!

But recently I found a good use case for it.

I had ripped Flash Boys: A Wall Street Revolt to mp3s and wanted to move it to my Nexus 5.

I put the USB A end into Trump and dragged the mp3s to it. I ejected it and took it over to the phone.

When I plugged it in I got this in the Notification area.


I tapped on "PNY USB drive" and got this.


I long tapped on "Michael Lewis" and then pulled down "...".


I tapped on "Copy to ...".


And I was able to copy the folder to the phone.

To eject it, I pulled down the notification shade again, opened the Settings and ejected it.


If it would just fit on my key chain I'd use it a lot more. By the way, it did get hot while plugged into the phone.

Oh, there's one for the iPhone too with a slight Apple tax.