One thing I immediately noticed on the Captivate was that there was no way to take a screen capture. I searched and all I found were several that required either rooting or USB cable connection to a PC.
Then on androidforums.com I found a post that referred to Screen Capture Shortcut.
There's a free version and a "donate" version. On the free version, when you launch it you'll find "capture from notification." Check that. Just below is "capture delay." I set that to 1 second. Then exit the app.
When you want to capture a screen drag the notification bar down and click on the "Screen Capture Shortcut" notification. After the delay period (1 second in my case) the screen will be captured and written to a folder in internal storage named "ScreenCapture." It appears that the donate version has an option to "capture on shake."
Monday, May 30, 2011
Monday, May 23, 2011
TiVo
Comcast is becoming Xfinity. This is a made-up word meaning that they're going to take more of your money.
There is a long sordid story regarding clear QAM channels and Digital Transport Adapter (DTA, also known sarcastically as Digital To Analog) but that's for another time.
Along the way to Xfinity Comcast Memphis has reflashed their DVRs. The new software is being rolled out to a number of markets and seems to be universally disliked. Truthfully there are gains and losses in the new software but as usual the losses stand out.
Just like "you can't fight city hall" you pretty much can't fight Comcast. AT&T's U-verse isn't available in my neighborhood. I don't want satellite dishes on my roof and I hear too many complaints about signal loss during thunderstorms.
Anyway on to my TiVo experiences.
I had a co-worker that had an early TiVo and had been very satisfied with it. When I got to checking the prices I found that the monthly service for the TiVo Premier was less than the Comcast DVR, $12.95 vs. $15.95. To get the $12.95 rate I had to get a refurbished model for $99. The TiVo rates and prices have just changed recently. The required multi-scan Cablecard was free from Comcast. Will wonders never cease?
The TiVo came quickly and the setup was easy. I'd heard horror stories about Cablecard pairing but the Comcast technician that brought the Cablecard had 3 TiVos at home. That went quickly.
Everything seemed good but then I noticed that none of the networking functions worked. I knew that the network connection was good and TiVo's own self-test worked. To make a long story kinda short TiVo sent me a replacement unit that worked fine. Even the Comcast re-pairing of the Cablecard was done over the phone with no problems.
I got the regular TiVo Premier with a 320GB HD rather than the TiVo Premier XL with a 1 TB HD. My thinking was that I could move the eSATA drive that I have been using on the Comcast DVR. Unfortunately TiVo is pretty particular about what external drives they support and I haven't tried my drive. After a couple of weeks using the TiVo I haven't gotten over 40% full.
The TiVo's Season Pass is better than Comcast's DVR's series recording. You can also setup a Wish List to record all programs that match a search criteria, e.g. with a certain actor.
TiVo also records TiVo Suggestions programs based on what programs you've recorded and/or watched. This is pretty neat in that during the first week of using the TiVo I had not completed setting all my Season Passes and missed an episode of a series we watch. I shrugged my shoulders and created a Season Pass to record that series in the future. Later as I was browsing my Suggested programs there was the episode that we had missed! Incredible.
Another capability I love is the network connectivity. You can search for programs and when found the TiVo gives you an episode summary by season. When you choose an episode TiVo will tell you where it is available, e.g. Amazon Video On-Demand. It also supports Netflix (I may have to reinstate my subscription) and YouTube. As we watched the Indy 500 Pole Day Simone de Silvestro was on. Rather than trying to explain to my wife what had happened to her, I paused the live TV and went to YouTube and showed her de Silvestro's crashes from Thursday practice and from last year's Texas race. Nice. Probably impressed me more than my wife but ...
I haven't gotten around to reprogramming my Logitech remote but I've come across an Android app to control it over Wi-Fi from my Captivate and the NOOK Color.
I've also found a Java app that gives me the same function from Windows 7.
You can also schedule recordings via the Internet for the TiVo. I know Xfinity advertises this same capability but it's not available in my area.
I'm not sure that the TiVo is a long term solution. I looked at building a Windows 7 Media Center and may do that yet. It is going to feel pretty good walking into Comcast with that hard-to-find HD DVR and telling them to ...
Wednesday, May 18, 2011
Which Camera?
You may have read my earlier post about my Samsung CL-65 (actually 2 of them). For Christmas 2010 my wife surprised me with a Panasonic Lumix DMC-ZS7.
I'm really torn between the 2 cameras and I wanted to stop and recap the capabilities and differences of them.
First I'll list the capabilities and differences and then discuss them. Please note that this is not intended to be a comprehensive analysis but rather the capabilities and differences that are important to me. You may have different objectives.
UI
While the Samsung's "gee whiz" touchscreen is fun at first, eventually you will find yourself bumping it when you don't intend to and changing something. If you're lucky you'll realize what it is and undo the change. If you're not lucky, ... You will eventually get to where you struggle to find a way to hold the camera for a long time with it turned on where you don't bump the touchscreen. This is especially problematic when you're waiting on the GPS to acquire satellites.
GPS
While we're talking about the GPS, there are significant and undocumented differences in the way each of these cameras' GPS works. The Samsung's GPS wakes up when you turn the camera on and starts trying to acquire satellites. If it is a "cold" GPS start it'll take a couple of minutes, sometimes longer than you want. If it is a "hot" GPS start, it'll take up to a minute. It could be better but it's actually good enough. Once it acquires the satellites the Samsung seems to continue updating the location. If you go look at this Picasaweb album you can actually track my walking around.
Panasonic's site says "By simply turning on the GPS function, the location data and time are automatically updated." Don't believe everything you read on the web.
The Panasonic actually keeps waking up the GPS periodically even when the camera is turned off. This should reduce the satellite acquisition time. Should is the operative word. If you store the Panasonic in a location where it can't acquire satellites all this does is run the battery down. What I did find significant was that the Panasonic only updates the GPS about every 5 minutes even when the camera is turned on. Look at this Picasaweb album and you'll see the pictures clustered where the Panasonic updated its GPS. The photos show only two locations although I clearly walked all around the house and yard.
This is apparently by design by Panasonic to reduce power consumption. There's even an icon on the screen that tells you this once you understand the issue.
You can force the Panasonic to update its GPS but that's not practical when you're walking around taking shots.
You can see this in several users' reviews on Amazon here and here.
For the trolls out there I am running Firmware version 1.2 on the Panasonic.
Optical Zoom
The numbers say everything. When you need to get up close and personal take the Panasonic.
Lens Design
The Samsung has a clever design that allows the lens to be completely contained within the compact size of the camera. The Panasonic has a traditional lens that protrudes as soon as you power on the camera and extends when you increase the zoom.
Process to Record Video
This gets back to the whole touchscreen UI issue but it is a real example. With the Samsung, you have to touch the mode section on the touchscreen and then select movie mode. This is hard to do one-handed.
On the Panasonic there is a dedicated button that starts taking video when you push it. "Piece of cake" as one of my former co-workers used to say.
Media
The Samsung takes a micro SD and the Panasonic takes a standard SD. They're close enough to the same price now as to not matter and almost all micro SDs come with a micro SD to SD adapter.
But that's just the point. The micro SD requires you to keep up with one more adapter and I can't see that much size advantage especially when you compare it to the battery. Yeah both cameras present removable drives to your computer when attached via USB but still ...
Charging
Why can't everything just charge off of a mini-USB? I know the EU has selected micro-USB and even that'd be Ok.
Both of these cameras charge using proprietary techniques. The Samsung at least uses a USB-powered cable but it's specific to this camera. To charge the Panasonic you have to remove the battery and put it in a charging shoe that plugs into the wall. While it will accept 110V or 240V it only has a US plug so that will require an adapter when I go abroad.
Connectivity
While the Samsung sounds like it has a definite advantage don't judge too soon. According Samsung's user guide Bluetooth connectivity is limited to "you can send photos only to mobile phones or PDAs" so you can't Bluetooth transfer them to your laptop. Using the Wi-Fi I've only been able to connect with no security or WEP security (isn't that the same thing?). Samsung's customer support couldn't help either. And DLNA, you get bonus points if you know what that is.
Size
The two cameras are almost identical size in every dimension except depth where the Panasonic is slightly more than .5 inches thicker. You'll quickly see how much this matters when you try to slip it into the pocket of last year's jeans. Enough said.
Conclusion
I don't know. I like them both and am using them both. My general thinking is that if I'm going to be outside where the GPS can acquire satellites the Samsung is my preference. But if I need a long reaching zoom or quick video it's the Panasonic.
I'm really torn between the 2 cameras and I wanted to stop and recap the capabilities and differences of them.
First I'll list the capabilities and differences and then discuss them. Please note that this is not intended to be a comprehensive analysis but rather the capabilities and differences that are important to me. You may have different objectives.
Feature | Samsung | Panasonic |
UI | Touch screen | Traditional buttons |
GPS frequency | Continuous | ~ Every 5 minutes |
Optical zoom | 5X | 12X |
Lens design | Internal | Traditional |
Process to record video | Touch screen navigation | One button |
Media | Micro SD | SD |
Charging | USB | Remove battery |
Connectivity | Bluetooth, Wi-Fi, DLNA | None |
Overall size | 3.94 x 2.4 x .75 | 4.07 x 2.35 x 1.28 |
UI
While the Samsung's "gee whiz" touchscreen is fun at first, eventually you will find yourself bumping it when you don't intend to and changing something. If you're lucky you'll realize what it is and undo the change. If you're not lucky, ... You will eventually get to where you struggle to find a way to hold the camera for a long time with it turned on where you don't bump the touchscreen. This is especially problematic when you're waiting on the GPS to acquire satellites.
GPS
While we're talking about the GPS, there are significant and undocumented differences in the way each of these cameras' GPS works. The Samsung's GPS wakes up when you turn the camera on and starts trying to acquire satellites. If it is a "cold" GPS start it'll take a couple of minutes, sometimes longer than you want. If it is a "hot" GPS start, it'll take up to a minute. It could be better but it's actually good enough. Once it acquires the satellites the Samsung seems to continue updating the location. If you go look at this Picasaweb album you can actually track my walking around.
Panasonic's site says "By simply turning on the GPS function, the location data and time are automatically updated." Don't believe everything you read on the web.
The Panasonic actually keeps waking up the GPS periodically even when the camera is turned off. This should reduce the satellite acquisition time. Should is the operative word. If you store the Panasonic in a location where it can't acquire satellites all this does is run the battery down. What I did find significant was that the Panasonic only updates the GPS about every 5 minutes even when the camera is turned on. Look at this Picasaweb album and you'll see the pictures clustered where the Panasonic updated its GPS. The photos show only two locations although I clearly walked all around the house and yard.
This is apparently by design by Panasonic to reduce power consumption. There's even an icon on the screen that tells you this once you understand the issue.
You can force the Panasonic to update its GPS but that's not practical when you're walking around taking shots.
You can see this in several users' reviews on Amazon here and here.
For the trolls out there I am running Firmware version 1.2 on the Panasonic.
Optical Zoom
The numbers say everything. When you need to get up close and personal take the Panasonic.
Lens Design
The Samsung has a clever design that allows the lens to be completely contained within the compact size of the camera. The Panasonic has a traditional lens that protrudes as soon as you power on the camera and extends when you increase the zoom.
Process to Record Video
This gets back to the whole touchscreen UI issue but it is a real example. With the Samsung, you have to touch the mode section on the touchscreen and then select movie mode. This is hard to do one-handed.
On the Panasonic there is a dedicated button that starts taking video when you push it. "Piece of cake" as one of my former co-workers used to say.
Media
The Samsung takes a micro SD and the Panasonic takes a standard SD. They're close enough to the same price now as to not matter and almost all micro SDs come with a micro SD to SD adapter.
But that's just the point. The micro SD requires you to keep up with one more adapter and I can't see that much size advantage especially when you compare it to the battery. Yeah both cameras present removable drives to your computer when attached via USB but still ...
Charging
Why can't everything just charge off of a mini-USB? I know the EU has selected micro-USB and even that'd be Ok.
Both of these cameras charge using proprietary techniques. The Samsung at least uses a USB-powered cable but it's specific to this camera. To charge the Panasonic you have to remove the battery and put it in a charging shoe that plugs into the wall. While it will accept 110V or 240V it only has a US plug so that will require an adapter when I go abroad.
Connectivity
While the Samsung sounds like it has a definite advantage don't judge too soon. According Samsung's user guide Bluetooth connectivity is limited to "you can send photos only to mobile phones or PDAs" so you can't Bluetooth transfer them to your laptop. Using the Wi-Fi I've only been able to connect with no security or WEP security (isn't that the same thing?). Samsung's customer support couldn't help either. And DLNA, you get bonus points if you know what that is.
Size
The two cameras are almost identical size in every dimension except depth where the Panasonic is slightly more than .5 inches thicker. You'll quickly see how much this matters when you try to slip it into the pocket of last year's jeans. Enough said.
Conclusion
I don't know. I like them both and am using them both. My general thinking is that if I'm going to be outside where the GPS can acquire satellites the Samsung is my preference. But if I need a long reaching zoom or quick video it's the Panasonic.
Tuesday, May 10, 2011
SSH Tunneling
I'm still worried about privacy at public hotspots. I use https on everything that I can and just don't use confidential data on any service that doesn't support https. But you just never know. Firesheep scares me.
One of my co-workers uses LogMeIn Pro and does all his "work" on his home PC. That angle interested me but while I use LogMeIn Free for occasional remote access it requires a persistent application running on the target PC. And LogMeIn only uses a userid/password for access security.
I wondered if there wasn't something that I could do in my router. I discovered that dd-wrt supports SSH Tunnels (I don't agree with the "easy" adjective).
I decided that I wanted this SSH tunnel to "land" on a virtual machine on my home PC. That way I can closely manage what that "PC" has access to on my home network.
I found a refurbished Cisco E2000 for less than $40 that has a gigabit switch, 802.11N Wi-Fi, and supports dd-wrt.
I'm really big into portable apps that run from my USB drive so a friend pointed me to PortaPuTTY.
Configuring PortaPuTTY wasn't obvious to me either (hmmm, there's a pattern here) but with my friend's generous help I got it working!
One of the first things you need to do is to generate a key pair for the SSH session. PortaPuTTY has a key generator included.
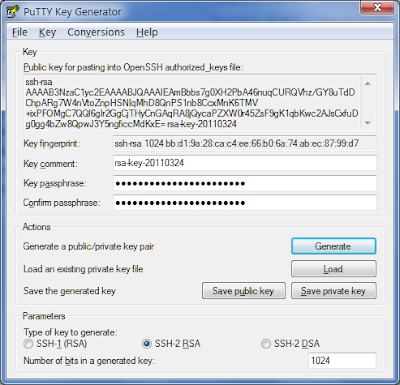
Notice that you also have to establish a passphrase so that even if you lose the USB drive you're still protected.
dd-wrt "support" is the typical open source support. They do miracles but communication is not their strong suite. I finally found the bits for my router and the flashing was easy. dd-wrt is certainly a very capable firmware and gives so much more information than OEM firmware.
To enable the SSH support in dd-wrt v24 and higher go to Administration/Management and enable "SSH Management" and put in a value for "SSH Remote Port." We'll use that later.
Now go to Services/Services and scroll down to "Secure Shell". Enable "SSHd". Enter the port from above. Paste into "Authorized Keys" the key from PuTTY Key Generator.
Be sure to click on "Save" at the bottom.
Then I put the private key in the PortaPuTTY folder on the USB drive. Whew! And we're just getting started.
Next in PortaPuTTY you'll need to set the "Host Name (or IP address)" for your home system. If you don't have a fixed IP address you'll need to use dyndns or something similar (dd-wrt has an embedded solution). For "Port" use the value for "SSH Remote Port" that you used in dd-wrt. I strongly suggest that you use a non-standard port.
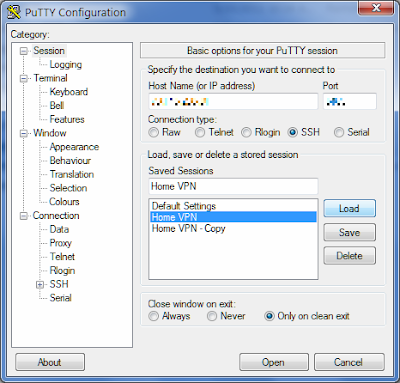
When you're done you'll come back to this screen and save the session information.
Next go down to "Connection" and "Data" and enter "root" as the "Auto-login username". This is required by dd-wrt's SSH support.
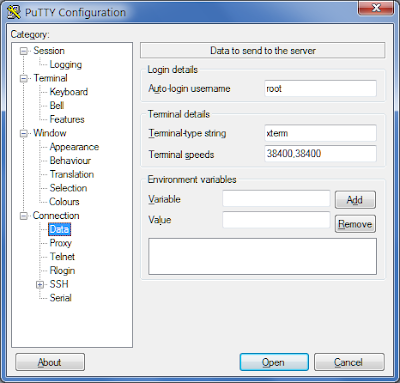
Expand the "SSH" selection and click on "Auth". Click on "Browse" and find the private key file created above.
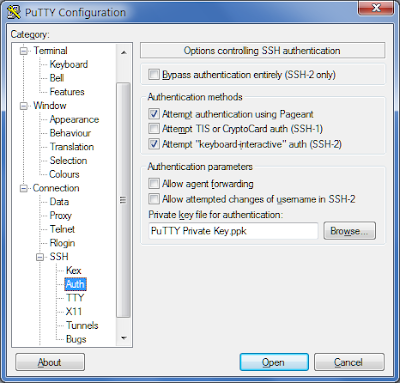
Click on "Open" and when you get back to this screen delete all the path information except the file name. That'll let you run this regardless of what drive letter is assigned to your USB drive.
Go down to the "Tunnels" section and put a port of your choosing in the "Port" field. I used 4444 but it doesn't matter much. In the "Destination" field, put the local address, e.g. 192.168.0.107, and a colon and then "3389". This assumes that the listening service on the target PC uses 3389 which is the default for Remote Desktop Protocol.
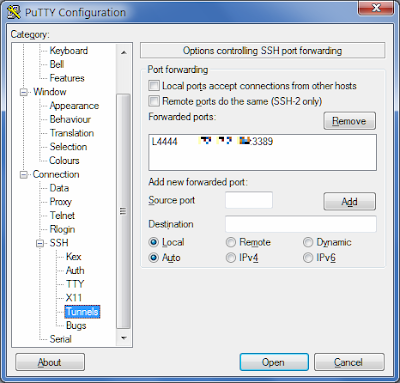
Click on "Add."
You don't need to change the RDP port number to a non-standard value because it is not advertised on the Internet, only to the LAN. The router's NAT firewall ensures that. You can change it if you want to.
I'm using Oracle's VirtualBox which allows you to have multiple VRDPs (Virtual Remote Desktop Protocols) running for different Virtual Machines. You do this by specifying VRDP ports for each one.
Note that the IP address here is the address of the PC running the Virtual Machines, not the IP address of the Virtual Machines proper. This is because the VirtualBox service offers the VRDP sessions for the Virtual Machines. Whew again!
Don't forget to go back to the first screen and save this session configuration. Incidentally the reason that PortaPuTTY is portable is that it saves the session information in the .putty/sessions sub-folder.
At this point I go into the PortaPuTTY .putty/sessions sub-folder and mark that session file I just created as read-only.
Next you'll need to create a RDP profile. Go to Start/All Programs/Accessories/Remote Desktop Connection.
In the first screen put "localhost:4444" or whatever port you specified above.
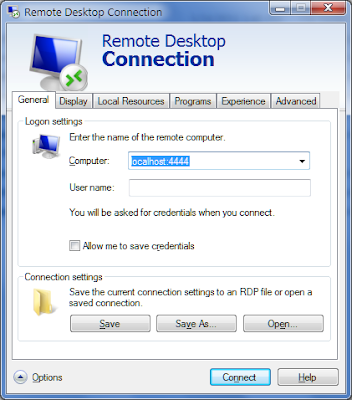
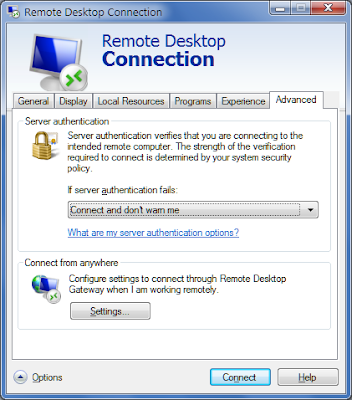
The following screens are my other settings. You may have your own preferences here.
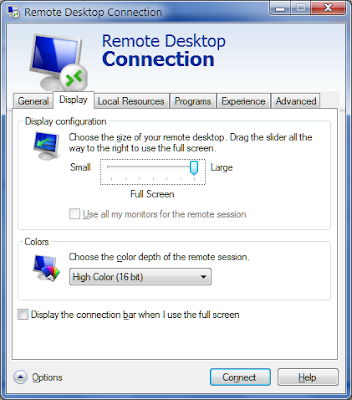
Remember to go back to the "General" tab and save the profile in the PortaPuTTY directory. Click the red "X" to close this.
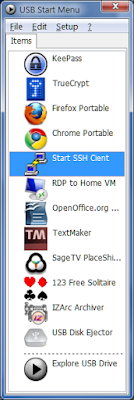
I still use PStart to manage my USB drive.
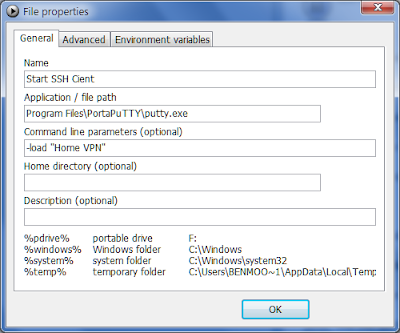
Here're the parameters I use for the SSH entry.
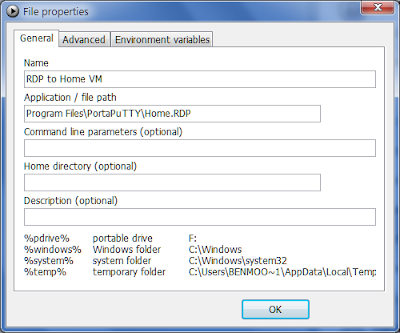
And for the RDP session.
Go to the PStart menu and double click on the "Start SSH Client" entry.
You'll get this screen. Enter the passphrase you created above.
Now go back to PStart and double click on the "RDP to Home VM" entry.
When you're done with the SSH session, close the RDP session. Go back to the SSH window and enter "exit" and press Enter.
Remember that your speed is limited to the home's upload speed. For me that's AT&T's DSL Xtreme 6.0 at 512 Kbps (yeah, right).
Good luck.
Thanks to splashup for the image editing for this post.
One of my co-workers uses LogMeIn Pro and does all his "work" on his home PC. That angle interested me but while I use LogMeIn Free for occasional remote access it requires a persistent application running on the target PC. And LogMeIn only uses a userid/password for access security.
I wondered if there wasn't something that I could do in my router. I discovered that dd-wrt supports SSH Tunnels (I don't agree with the "easy" adjective).
I decided that I wanted this SSH tunnel to "land" on a virtual machine on my home PC. That way I can closely manage what that "PC" has access to on my home network.
I found a refurbished Cisco E2000 for less than $40 that has a gigabit switch, 802.11N Wi-Fi, and supports dd-wrt.
I'm really big into portable apps that run from my USB drive so a friend pointed me to PortaPuTTY.
Configuring PortaPuTTY wasn't obvious to me either (hmmm, there's a pattern here) but with my friend's generous help I got it working!
One of the first things you need to do is to generate a key pair for the SSH session. PortaPuTTY has a key generator included.
Notice that you also have to establish a passphrase so that even if you lose the USB drive you're still protected.
dd-wrt "support" is the typical open source support. They do miracles but communication is not their strong suite. I finally found the bits for my router and the flashing was easy. dd-wrt is certainly a very capable firmware and gives so much more information than OEM firmware.
To enable the SSH support in dd-wrt v24 and higher go to Administration/Management and enable "SSH Management" and put in a value for "SSH Remote Port." We'll use that later.
Now go to Services/Services and scroll down to "Secure Shell". Enable "SSHd". Enter the port from above. Paste into "Authorized Keys" the key from PuTTY Key Generator.
Be sure to click on "Save" at the bottom.
Then I put the private key in the PortaPuTTY folder on the USB drive. Whew! And we're just getting started.
Next in PortaPuTTY you'll need to set the "Host Name (or IP address)" for your home system. If you don't have a fixed IP address you'll need to use dyndns or something similar (dd-wrt has an embedded solution). For "Port" use the value for "SSH Remote Port" that you used in dd-wrt. I strongly suggest that you use a non-standard port.
When you're done you'll come back to this screen and save the session information.
Next go down to "Connection" and "Data" and enter "root" as the "Auto-login username". This is required by dd-wrt's SSH support.
Expand the "SSH" selection and click on "Auth". Click on "Browse" and find the private key file created above.
Click on "Open" and when you get back to this screen delete all the path information except the file name. That'll let you run this regardless of what drive letter is assigned to your USB drive.
Go down to the "Tunnels" section and put a port of your choosing in the "Port" field. I used 4444 but it doesn't matter much. In the "Destination" field, put the local address, e.g. 192.168.0.107, and a colon and then "3389". This assumes that the listening service on the target PC uses 3389 which is the default for Remote Desktop Protocol.
Click on "Add."
You don't need to change the RDP port number to a non-standard value because it is not advertised on the Internet, only to the LAN. The router's NAT firewall ensures that. You can change it if you want to.
I'm using Oracle's VirtualBox which allows you to have multiple VRDPs (Virtual Remote Desktop Protocols) running for different Virtual Machines. You do this by specifying VRDP ports for each one.
Note that the IP address here is the address of the PC running the Virtual Machines, not the IP address of the Virtual Machines proper. This is because the VirtualBox service offers the VRDP sessions for the Virtual Machines. Whew again!
Don't forget to go back to the first screen and save this session configuration. Incidentally the reason that PortaPuTTY is portable is that it saves the session information in the .putty/sessions sub-folder.
At this point I go into the PortaPuTTY .putty/sessions sub-folder and mark that session file I just created as read-only.
Next you'll need to create a RDP profile. Go to Start/All Programs/Accessories/Remote Desktop Connection.
In the first screen put "localhost:4444" or whatever port you specified above.
The following screens are my other settings. You may have your own preferences here.
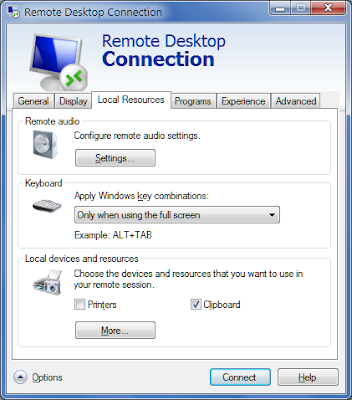
Remember to go back to the "General" tab and save the profile in the PortaPuTTY directory. Click the red "X" to close this.
I still use PStart to manage my USB drive.
Here're the parameters I use for the SSH entry.
And for the RDP session.
Go to the PStart menu and double click on the "Start SSH Client" entry.
You'll get this screen. Enter the passphrase you created above.
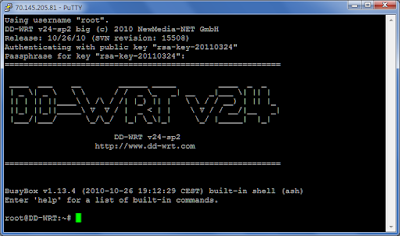
Now go back to PStart and double click on the "RDP to Home VM" entry.
When you're done with the SSH session, close the RDP session. Go back to the SSH window and enter "exit" and press Enter.
Remember that your speed is limited to the home's upload speed. For me that's AT&T's DSL Xtreme 6.0 at 512 Kbps (yeah, right).
Good luck.
Thanks to splashup for the image editing for this post.
Subscribe to:
Posts (Atom)